Book Index

Creating a Leave Type

When an employee fills out a leave management request in Quadrant Self Service (or a manager submits one for them), they are required to enter a leave type. Leave types must first be configured on the Leave Management window (Configuration menu) in Quadrant.

In This Section

To create a leave type

See Also

Configuring Leave Type Eligibility

Configuring Leave Management Expansion

To create a leave type
  1. From the Configuration menu, select Leave Management > Setup tab.
  2. Click Add.
  3. Enter a code for the leave type.
    An abbreviation of the description works well.
  4. Type a description for the leave type in the Description box.
    50 characters maximum.
  5. Enter a comment prompt.
    The comment prompt appears above the Comment box on the Leave Request self service page. It explains to the employee why they need to enter a comment or describes the type of information that they need to enter in the Comment box.
  6. Select a Notification Method.
    Email notifications are automatically sent to affected managers and employees when a leave request is initially entered into the system, as well as when it is approved, denied, edited, or cancelled.

    Note! If you have not already configured Notification Methods, none will be available for selection in the Notification Method list box.

  7. If required, change the default settings for Active Flag, End Date Required, and Employee Comment Required options.

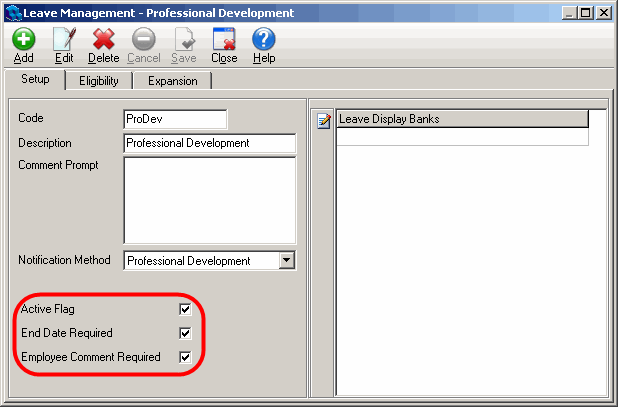
    By default, these options are selected. When the Active Flag option is selected, the leave type is available for selection on the leave management component. If at some point you decide that you no longer want that leave type to be available, the Active Flag check box can be cleared and the leave type will no longer be available for selection. It is not, however, permanently deleted from the system and can be reactivated at any time.

    The End Date Required option forces a user to enter an end date for the leave request. In most cases, a leave will be close ended, with a specific return date. Occasionally, a leave, for example a medical leave, could be open ended with no return date.

    When the Employee Comment Required option is selected, an employee must enter a comment, perhaps describing the nature of their leave, when they submit a leave request.

  8. Click Save.
  9. Click the Edit button on the left side of the Leave Display Banks pane.
    The Leave Banks dialog opens.

  10. Select banks that you want to associate with the leave type in the Available pane and use the arrows to move them into the Selected pane.
    Press Ctrl+click to make multiple selections. When an employee creates a new leave request, the benefit banks associated with the leave type and the banked hours they contain appear on the leave request form. Users and managers can check, at a glance, how many hours the requester has banked and if they have enough time banked to cover the requested leave.

  11. Click OK.

Next, you need to determine which employee groups are eligible to use the leave type you just created.