System Configuration for Quadrant Self Service
For Quadrant Self Service to work, the URL of the site must be specified on the System Configuration window in Quadrant. The information that appears on the Personal menu in Quadrant Self Service, for example, employee benefit banks, email contact addresses, and Competencies, are also selected in System Configuration. Other information, such as Pay Statements, appears by default.
To select system configuration settings for Quadrant Self Service
- Open Quadrant.
- Open the Administration menu, and then the System Configuration window.
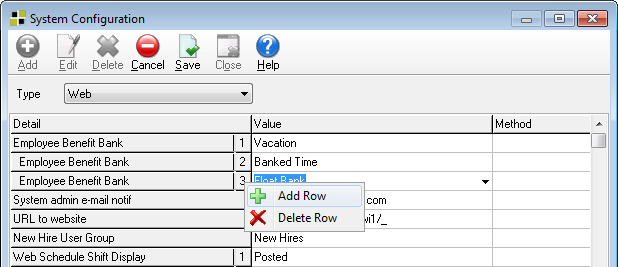
- Select Web from the Type list box, and then click Edit.
- Click in the Value field in the Employee Benefit Bank row to activate a drop-down arrow.
- Click the drop-down arrow and select a benefit bank from the list.
This specifies what benefit banks you want displayed on Quadrant Self Service. Benefit banks that appear on Quadrant Self Service are for reference only and cannot be edited. - If you want to select additional banks, right-click the 1 at the left side of the Value field and select Add Row from the shortcut menu that appears. Another Employee Benefit Bank row appears, allowing you to select another benefit bank.
- Click in the System admin email notif Value field and type the email address of a system administrator.
If an error occurs in Quadrant Self Service, for example due to a problem with configuration, an error message will be sent to this email address. You should use the email address of the person who is the overall administrator of Quadrant Self Service. - Enter the URL for Quadrant Self Service in the URL to Website field.
- Select a user group from the New Hire User Group field.
Members of this user group are managers, HR people, or recruiters who need to have access to new hires when they enter the system. - The Web Schedule Shift Display option enables you to control which Scheduling shift statuses are visible to employees in Quadrant Self Service. Options for this field are:
Approved
Design
Posted
Timecard - The Leave Mgmt Relief Default option enables you to set the state of the Relief Required checkbox in new Quadrant Self Service leave requests. If Leave Mgmt Relief Default is set to Yes, the Relief Required checkbox in Quadrant Self Service will be filled. If set to No, the Relief Required checkbox will be clear on new Quadrant Self Service leave requests.
- Leave the Demographics: EE. . . rows at their default setting of Allowed, or select Not Allowed from one or all. A selection of Not Allowed prevents users from editing their demographic records in Quadrant Self Service.
Note! If you are currently using header/footer scripts to disable employee demographics, edits must manually set the configuration options mentioned above to Not Allowed after upgrade. If this action is not performed, employees will be able to make changes to demographics in Quadrant Self Service.
- Select Yes from the Enable Volunteer Functionality list box to allow volunteers to create user accounts in Quadrant Self Service, otherwise, set to No. When set to Yes, volunteers have the same access rights as employees with the exception of job postings, leave requests, and Self Scheduling tabs.
- Click in an Employee skills to display row and select a competency from the list that appears. The choices are Designations, Education, Skills, and Soft Skills.
To add additional competencies, right-click the 1 at the left side of the Value field and select Add Row from the shortcut menu that appears. Another skills row appears, allowing you to select another skill type to display on the Competencies page. - Select Yes if you want to display the start and end date columns for the competencies and skills you selected above. Select No if you don't want to display the columns.
- The Web Lookup Sort Field enables you to control the order of items in several areas of Quadrant Self Service. You can select either Description (alphabetical) or Sort Order (as configured in Lookups). The default value is Description.
- The Web Leave Seniority Calc field enables you to control how you represent the hours in the Seniority column on the Manage Leave Requests page in Quadrant Self Service. If you choose Leave Position Only, only the employees’ seniority hours for the position included in the leave request will be shown. If you choose Total Seniority Bank, the seniority hours for all their positions will be shown.
- Click Save.
- Select Scheduling from the Type list box, and then click Edit.
- Click in the Value field in the Seniority Bank row to activate a drop-down arrow.
 After you add the Seniority Bank column you can't remove it. You can only select a different bank.
 - Select a bank from the list, and then click Save. The selected bank will appear on the Manage Leave Requests page.
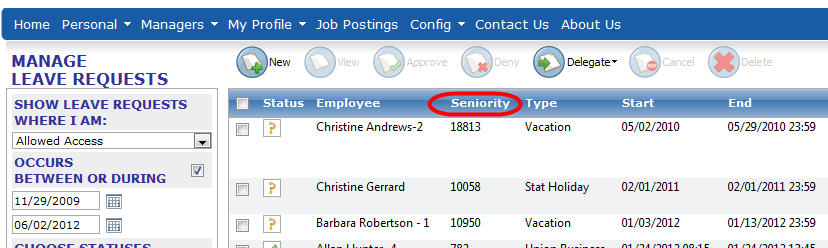
The following conditions also apply to the Seniority Bank column:
- The Seniority Bank column will always be labeled "Seniority" and cannot be edited, regardless of the bank you select in System Configuration.
- The values shown in Seniority Bank column are rounded-down. For example, if the seniority hours for an employee are 279.5 hours, Quadrant Self Service displays 279 in the Seniority Bank column.
- You can add additional Seniority Bank rows, but only the first entry will be displayed in Quadrant Self Service.