Attaching a File to an Application
The Manage Application page allows managers to attach additional files to an applicant's account. Two types of uploads are available: Upload File and Upload for Applicant. When you upload a file using the Upload File option, you can remove the file at a later date. If you upload a file using the Upload for Applicant option, only the applicant can remove the file from their account.
To attach a file to an application
- Open the Manage Applicants page.
Managers > Recruiting > Manage Applicants. - Select a posting or an applicant in the Job Posting pane.
- Click the Applicant button, and then Manage Application.
- Click the Attachments tab on the Manage Application page.
- Click Select.
A Choose File dialog opens. - Browse to a file location, and then click Open.
- Click Upload File.
- To upload a file for an applicant, click the Upload for Applicant button rather than the Upload File button.
After you have uploaded a file for an applicant, you cannot remove it. - Click OK on the information dialog that opens.
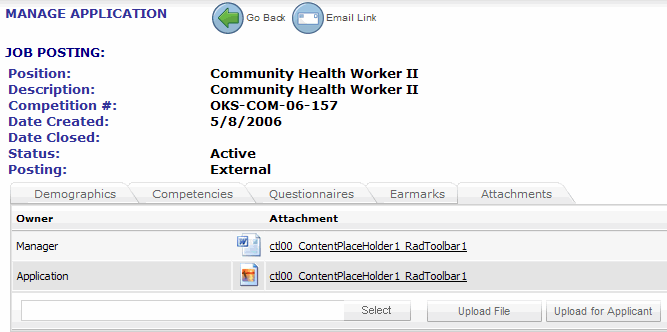
Notice in the graphic above that the Manager is the owner of files they uploaded by pressing the Upload File button, while the applicant is the owner of files uploaded for them by the Manager using the Upload for Applicant option. Attachments can be deleted by selecting one, and then clicking Delete. However, only the applicant can delete an attachment that was uploaded for them by a Manager.
Note! If a virus is uploaded to Quadrant Self Service via the applicant attachment upload, the following error message appears:
An error occurred while uploading the file. Please contact the System Administrator if this error persists.
The error is logged in the Windows event log on the Web server. After the error is cleared, the applicant is able to successfully upload a safe file.
To create a template that includes self scheduling shifts
- Open the Configuration menu, and then the Schedule window.
Alternately, click the Load Scheduling button  on the main Quadrant toolbar.
The Schedule window appears. - On the main Schedule window toolbar, click the arrow next to the Template button, and from the menu that appears, select New Schedule Template.

Note! A bullet indicates the last selection made from the menu. If you click the Template button, the template opens to the default (bulleted) option.
- Select a unit from the Units list box.
For Self Scheduling to work, you must select a unit that was also selected on the Self Scheduling Setup window. - Type a readily identifiable name for the template in the Description box.
- Use the date picker to select a start date for the template.
- Leave the End Date field blank unless you know that you want the template to be effective for a limited time.
- Choose a Cycle Length in days.
The cycle length determines the length of the rotation. A two-week rotation would be entered as 14 days. It is important to enter the correct value because this cannot be changed after the template is created. - In the Cycles to Paste box, select the number of cycles you want pasted to the schedule.
The system default is 1. However, some organizations like to create a schedule up to a year in advance. When you extrapolate (or paste) the template to the schedule you can change this number if you like.
- Click OK.
The new schedule template appears, ready for adding rows, associating employees to the rows, and plotting shifts.